Wednesday 31 July 2013

Is Glossybox Worth it?

In case you didn't already know, GlossyBox is a monthly subscription service where you pay a set amount each month to regularly receive a little box of beauty products to try. GlossyBox refer to themselves as The Ultimate Beauty Experience, you get 5 items each time; it's similar to the Beauty Box Five in America.

I haven't tried it, but it does sound like a good opportunity to experiment with new brands and try new things! Have you ever tried GlossyBox or Beauty Box Five, and did you like it? I'd love to hear what you thought of them :)


Tuesday 30 July 2013

What is BB Cream?

Over the last few months there has been a lot of hype over BB Cream but there's still a lot of people that don't know exaclty what it is. So, I hear you ask, what is it then? Well BB Cream basically claims to be a miracle product...
In general BB Cream is supposed to do the following:


  • cover blemishes like a foundation
  • hydrate skin like a moisturiser
  • act as a face primer
  • help to clear up spots and oil
  • some even claim to even out pigmentation with prolonged use
  • protect skin with an SPF factor
  • contain no oil
  • brighten face and enhance skin's glow
BB Cream is pretty much aimed at people who don't need a huge amount of coverage, as an alternative to heavy foundations. But if you do need more coverage, then there are 'CC Creams' available which cover uneven skin and blemishes more, also many CC Creams contain anti-ageing ingredients.

So, if all of this is true, they sound amazing! BB Creams/CC Creams should be multiple products all in one but still feel light and fresh on the face. Also, they should be suitable for all skin types and they hydrate for dry skin but also clear pores for oily skin! There are many BB Creams around (some are made specifically for oily skin- Maybelline in particular make these, it does sound as if everyone can find a perfect BB Cream) some are from high street make up brands, as well as more upmarket ones but it seems like something to try at least once!

So in true Gary Barlow style, they sound ABSOLOOOUUUTELY FAAANTAAASTIC!

Oh! And if you are curiously wondering what "BB" stands for....it is "Beauty Balm" !
I hope this answered all your BB related questions!
P.S. I recently ordered a Maybelline BB Cream and the review will be linked here once I have written it!


Monday 29 July 2013

FOTD: Kate Moss Lipstick


This is my first Face of the Day post, but I always like reading them so I thought I'd give it a go, let me know what you think!

Here is everything I used:

  • E.L.F Complete Coverage Concealer
  • MUA Cover & Conceal
  • Max Factor FaceFinity Foundation
  • L'oreal True Match Powder/ M&S loose powder (I mixed them together in the pot to make a better colour)
  • Sleek Face Contour and Highlight Kit
  • Maybelline Dream Touch Cream Blush
  • Maybelline Mega Plush Volum'Express Mascara
  • Rimmel Exaggerate Lip Liner in Eastend Snob
  • Kate Moss for Rimmel Lipstick in 01
  • Smashbox Eyeshadow for Blue Eyes in sabel, cream and mocha

I did my face in a fairly standard way so foundation, blusher, highlighter and contouring (I don't do all of this everyday but I did today)
My eyes are done in neutral colours which is how I've been doing them a lot lately, it seems to suit me most to stick to browns, creams and gold colours
I love wearing different lip colours everyday and today I went for this darkish red colour as I bought it a few days ago. I'd seen many of Zoe (from Zoella) 's videos and she was always wearing a deep red lipstick and I LOVED it, but I never knew what brand it was, but in one video she mentioned Kate Moss' lipsticks for Rimmel in shade 01 and I think that's the one she wears, so I bought it straight away and I am so glad I did!

This is my Face of the Day for today! :)

And erm yeah, that's it then...don't do drugs, stay in school...and all that jazz....!

Wednesday 24 July 2013

DIY: Dip Dye and Studded Denim Shorts


 Aloha! Summer is finally here and it is ACTUALLY sunny, in England (whoa... I know right!) So let's celebrate with some ombre shorts!

A while ago I bought these plain denim shorts in Primark and I think they were about £5 or £8... It was difficult to find a pair in Primark that weren't already bedazzled....but I wanted to get some cheap shorts so if I completely messed it up and ruined them then it wouldn't matter too much.

I started by dip dyeing the bottom of the shorts by soaking them in bleach. It took ages to work, but to do it I put them in a bucket with some bleach (just the normal stuff you buy in supermarkets) and a little bit of water mixed in. I left them to soak for a long time as it didn't seem to be lightening them at all (probably because the denim of my shorts is so dark) I took them out and left them to hang overnight and washed them in the washing machine in the morning (wash all the bleach out or it will damage the denim)
I would say to make sure it works, don't be afraid about the amount of bleach you need to use because I tried it once and put waaayyy too much water in the solution and it just made my shorts verrrryy soapy....
In the end, I am really happy with the ombre effect because it fades really well from white into light blue and then dark blue which looks really cool (I wanted them like that, rather than like white then straight to dark blue so I let them soak in bleach for a bit before pulling them out slightly to let the ends soak for longer to get them like this) Also, bleach does run in fabric so put the shorts into the bleach like an inch below where you actually want to lighten.

I then decided to add studs to them. I ordered these from eBay and I got 100 pyramid ones for £1.25 and 50 star shaped studs for about £3.00. They're really easy to use, you just push them in and bend the rivets back so they are secure. It was hard to push them through the thicker parts of denim like where the pockets have been edged but overall it was okay. I decided to line the front pockets and make a curved line along the back pockets with the pyramid studs and put 5 little stars on that weird pocket inside the right front pocket (what the hell are you supposed to put in that pocket!?) and I put 4 stars along one of the curves on the back pocket.


Et voila! They are done! And once I had worked out that you need more bleach to whiten shorts than you do to clean them...then I had some pretty snazzy dip dyed and studded denim shorts!


Saturday 20 July 2013

Blog Giveaway: Manicure/Pedicure Set

YAYYYY! A BLOG GIVEAWAY! Now as we all calm down a bit, let's take a look at the prize....

Up for grabs is this electronic Manicure & Pedicure set which is in a pretty snazzy purple colour! It has all the filing and buffing whatsits so you can do everyones nails all profesionally! 
It comes with the handle as well as all the attachments and the purple case which has a nail dryer on the side, also included is the plug to charge it and an instruction booklet.


To enter (and make us verrrryyy happy people) just follow us on twitter @SBARSfashion and click our "follow this site" button to follow the blog! We'd be very grateful and you'll have a chance of winning this lush nail set! Also, if you recommend the giveaway to a friend, you will be entered into the prize draw again! But you should find all this technical stuff below where you can enter the draw!

UK residents only please, due to postage costs

So go for it and GOOD LUCK!


a Rafflecopter giveaway

Thursday 18 July 2013

OOTD: Let's go to the beach 'each!

We spent Tuesday sunbathing at Southend's beach and making the most of this AMAZING heatwave!
Not that the whole experience was as relaxing as it sounds....we decided it was a good idea to attempt to walk out to the sea whilst the tide was out and had to trudge through quicksand and sharp rocks which was disgusting and painful but we were proud when we got there! :') Not to mention that a Rossi's ice cream did kind of make it all better....
Anyway, this is what I wore for the day...

~Shorts: Forever 21
~Top: Primark
~Bag: M&S
~Sandals: Forever 21
~Hairband: Primark
~Sunglasses: Forever 21
~Belt: Primark

I bought these minty green shorts with pink ice creams on a little while ago in Forever 21 and really loved them because the pattern is fun but they also have a really good shape to them and were so comfy to wear! I was unsure of what to wear with them at the time but I had bought sandals in the green colour and pink sunglasses on the same day so I was just stuck on what top to wear. In the end, I went for this oversized white t-shirt from Primark (it is actually supposed to be tight but I bought it in a bigger size to wear it loose) I decided to accessorise the outfit with a pink handbag from M&S and a pink flower headband that I bought to wear to prom which is from Primark. And to finish it off wore a skinny pink belt with a gold bow on the front which I am pretty sure is from Primark, but it may have been New Look!

Thanks for reading and hope you enjoyed it!

Friday 12 July 2013

How to Make: Fabric Flowers

This is a bit of a different post, but I love textiles and making clothes and things so this is all about how to make fabric flowers. There are a few different styles of fabric flowers you can make, I do prefer one type both for its simplicity to make but also its aesthetic effectiveness once made, but try them and decide for yourself!

Flower One: Layered Fabric Flower
difficulty rating *
what you will need: fabric, hand needle, thread, scissors, lace is optional
how to make it:
  • cut 10 evenly sized circles from your fabric
  • if you have chosen to include lace then cut 10 circles from this fabric as well
  • if you have chosen to include lace place each of your lace circles over the top of one of your circles of plain fabric, so you now have 10 circles
  • place two fabric circles on top of each other
  • sew a single hand stitch through the middle of the fabric to attach them to each other
  • now fold two of the circles in half and place them, folds facing together on top of your flower so far
  • sew a single hand stitch straight through the middle again
  • again fold two of the circles in half and place them folds facing together at 90 degrees to the last circles added on top of your flower
  • of course, attach them with a stitch through the middle
  • fold your remaining four circles into quaters by folding them in half twice
  • place them onto your flower all next to each other
  • attach them with a stitch straight through the middle
  • pull the "petals" up with your fingers to give it a full look


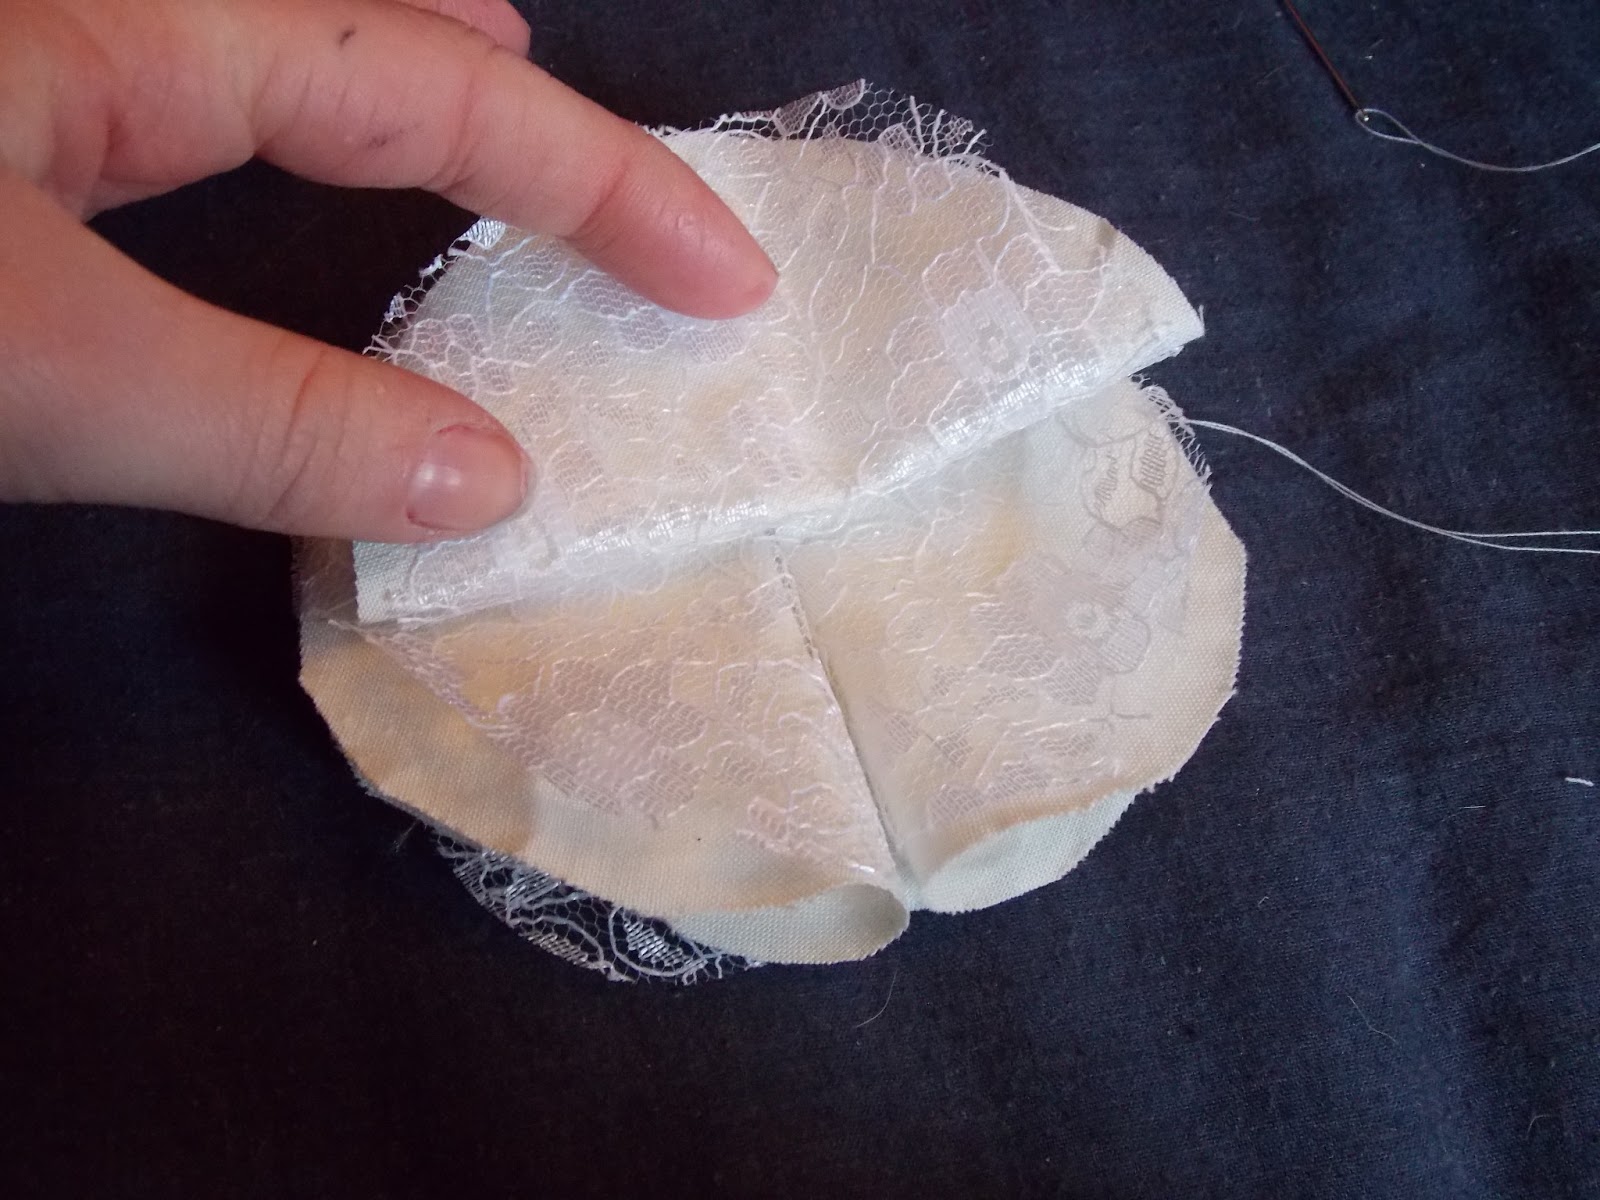
The steps sound complicated but when you actually do it, they aren't! Hopefully the pictures help, it is pretty simple! Also, personally I think lace looks really good on them and I usually use it. One important thing to remember is to use a fabric that does not fray as the flower will have raw edges, or else you will need to satin stitch (very close together zig zag stitch on sewing machine along a raw edge on fabric to prevent fraying)  the edges of the material before making the flower.


where to use it: these flowers look so pretty and you could try making really tiny ones with less circles and using them together in groups to decorate textile items, I think that would look really good! But in general you could use these anywhere you want, they look really good on clothes such as dresses or as corsages on lapels. They even make great add-ons for hair accessories or prom corsages and dresses! The uses are endless!

Flower Two: Daisy Flower
difficulty rating: **
what you will need: fabric, scissors, a button, hand needle, thread
how to make it:
  • cut six evenly sized squares
  • take one square and fold it diagonally in half once to form a triangle
  • and fold it again half, it should still make a triangle
  • and fold it over once more
  • fold the edges downwards, so that it looks like a little daisy petal
  • make sure the bottom of the petal is even by cutting off any excess fabric
  • thread your needle and sew a stitch straight through the bottom of the petal, making sure you go through all layers at once
  • repeat for all your squares of fabric, sewing the same piece of thread through them all so they are joined in a long chain
  • take the last petal around to the first, pull the thread tight and sew back through the first petal. Tie a knot in the thread, the petals should be joined in a circle and look like a flower
  • sew a button straight onto the middle, covering the hole
Sometimes it can be difficult to make all petals identical so it might take practice. Different sized fabric squares will make different sized flowers which will require a different number of petals to make, but 2inch squares should make a 6 petal flower.


where to use it: this flower has a simple and typical look, try making it with white fabric and a yellow button so it will look exactly like a daisy. It is perfect for textile items for kids like quilts or soft toys.

Flower Three: Suffolk Puff
difficulty rating: *
what you will need:  scraps of fabric, a button, hand needle, thread, scissors
how to make it:
  • cut a circle at the desired size from your fabric
  • sew a running stitch (plain in and out stitch) using your hand needle and thread, all the way around the edge of the circle
  • remove the needle and pull one end of the thread, gathering the fabric into the middle of the circle
  • you know have a puff shape with a hole in the middle. The last step is simply to sew a button or bead into the middle of the puff to cover the hole


where to use it: this could be used to decorate a variety of homemade textiles, primarily furnishings such as cushions or wall hangings.

~*~*~*~*~

Fabric flowers are a simple embellishment to make and obviously a good decorative technique for any garment. They can even be a way to cover a fault in a dress such as an irrepairable hole. My favourite is 'Flower One: Layered Fabric Flower' as they are quick and fun to make and look really snazzy once done and so have many uses. They look like a lot of work but in fact are very simple! Just remember to opt for a fabric that does not fray or else you will need to satin stitch the edges to prevent fraying! I hope you try some of these flowers and have fun doing it, there are more methods of making flowers but these are common and simple ones with a variety of uses. Go Go Go....Sew Sew Sew!

Prom Dress Diary 4: decoration

So now I had my prom dress put together, it was time to for decoration, which is the part I was most excited for!
Generally, I didn't want to go too over the top on decorating it but I was following the theme of pink flowers and silver glitter. I saw one of these really pretty cherry blossom trees and every time I saw it, it just reminded me of my prom dress :)


So to decorate my dress I.....


  • Sewed long silver beads along the edge of the lace cutout (I did have these beads around the neckline before I put the lace cutout panel on the top but I took those off)
  • Attached the embroidered tulle that I bought around the hem on my cotton skirt and let the glitter tulle layer of my skirt hang over it
  • I sewed a thick ribbon all around the waist which I wore tied up at the back
  • And finally, I made my corsage. This was actually my favourite part, it was fun just to make a little thing


My dress was done (pretty much) If I'm honest I did turn up at Louise's house a couple of hours before prom with a needle and thread still sewing my dress (just finishing it off!) But at least I had it all done before prom actually started!


This is my dress completely finished just before we left for Prom. I wore silver glitter heels and had my hair in a curly updo with pink flowers in it. I ordered a sliver clutch bag but it never arrived...WAAA D':


After I put my dress together, I noticed that it looks a lot like a Princess dress I used to have when I was little...so here is a bit of a throwback for ya!
I didn't intend to make a dress that looked like my old one at all and I only realised it when I'd nearly finished my dress and I saw this picture of me when I was little so it was just really weird when I noticed how similar they actually are!


Also, prom was actually a lot better than I expected it to be. It was a fun night and we both liked it, so that was good!


Prom Dress Diary 3: construction

Prom was a couple of weeks ago now, but I haven't had much time to write about my dress since then so now, here is me making the main part of my dress!


Okay so to start as I didn't buy a dress pattern to make my dress from I used the black crop top that I bought as a guide for a shape to make the top of my prom dress. So I cut the pink cotton to the shape of the top and cut pink lace to make the back. I sewed the top together with double stitched seams so they were strong as I wanted to make sure the lace would stay in place. I sewed the edges of the neckline and armholes. I used hook and eyes as fastenings on one arm.
Next, I cut the pink cotton by eye to make a long skirt and sewed plain seams down the sides. I then sewed the glitter tulle netting round in a circled and placed it over the cotton with pleats to make it fit the cotton. As I wanted the skirt of the dress to have some shape to it, I gathered it at the top before sewing it onto the top of my dress. I cut the cotton and tulle netting to the correct length and hemmed the cotton.

After I had done all this, I actually decided that I didn't like the neckline of the dress as it was so high and with the long skirt it just looked a bit too much, so I decided to cut a sort of hourglass shape through the middle of the top and inserted lace in the cutout space.

This was basically how I put my dress together and I have one more post coming on how I decorated it <3
Related Posts Plugin for WordPress, Blogger...